Even if you don’t have a dedicated workspace, you can still learn HOW TO MAKE JEWELRY AT HOME and keep your supplies organized.

You fingers practically twitch with creative energy.
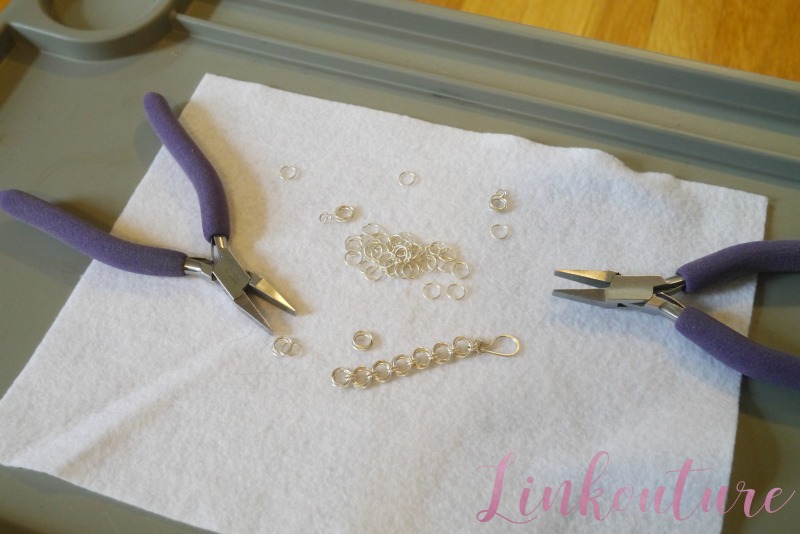
You long to use your hands to create something tangible, to pick up a set of pliers and weave a a Byzantine chainmail bracelet from those shiny new jump rings or to string those gorgeous aqua glass beads that have been sitting in a little plastic bag since you purchased them.

But with no dedicated space to work — and perhaps a small child or two running freely around your home, threatening at any moment to come in like a tiny tornado and wreak havoc on your latest DIY project — they end up collecting dust in a drawer.
Living in a 1200-square foot condo that I share with my two young daughters, husband, and a cat, I get it.
Related post: The one simple change I made to start making time for jewelry-making
I’m fortunate that now I have a dedicated studio/office space (with just a baby gate separating my precious 100 square feet from our living room).
But until 2014, my workspace consisted of a tiny desk in the corner of my bedroom that I couldn’t use during my prime work hours since my husband was sleeping.

When my older, Eve, was a baby, I’d strap her on and make jewelry at my little desk in the corner of my bedroom.
When I wasn’t working there (which was most of the time) I was working on my kitchen table. While I had ample space to spread out, it wasn’t ideal for what kitchen tables are typically used for.
Every day it was a battle of the jewelry supplies versus food, each encroaching on each other’s territory.
Jump rings spilled out to the half designated for eating (not to mention, the floor, our coffee table in the living room, the hallway, and in between couch cushions). At least once a week my husband threatened to throw my jewelry supplies away if I didn’t pick them up.

My beautiful creations were at constant risk of being sullied by liquids and crumbs.
Clearly, this wasn’t working very well. I needed something that was compact yet functional, as well as portable since from day to day I never knew where I would be working.
I finally buckled down and came up with a system for less than $30, one that works for any space, whether you have a dedicated craft room or are relegated to a corner of your living room.

Supplies for Creating a Portable and Compact Jewelry DIY Work Station
For your connivence, this post contains affiliate links which help me to run this blog. If you click on them and make a purchase, I may earn a small commission at no extra cost to you.
Recycled jars
Instead of throwing out jars of jam, pasta sauce, and baby food, wash them out, remove the labels, and use them to store beads and other jewelry-making supplies. It’s economical (and better for the environment).
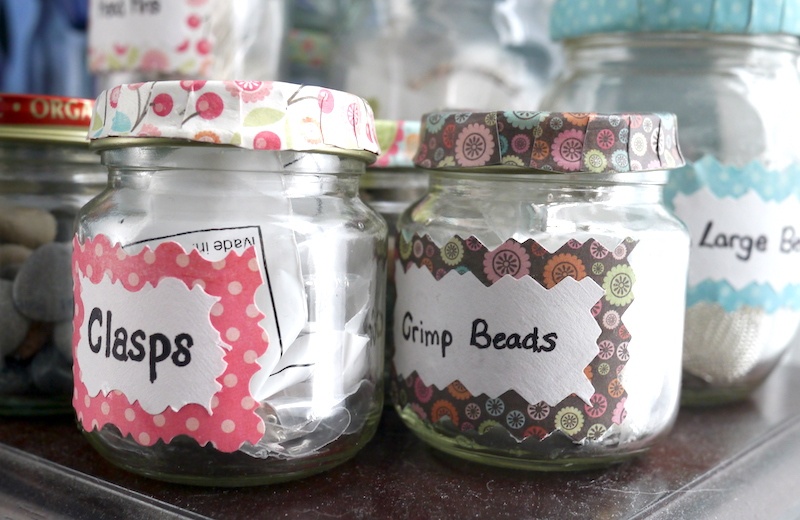
Your labels don’t have to be as fancy as mind (can you tell I made those before I actually had kids?) but it is helpful to label them somehow and keep your supplies separated.
Check a place like Freecycle or Buy Nothing to see if anyone has any jars they don’t need.
You can also use plastic tupperware-like food containers or food takeout containers to store supplies.
Related post: Where to get inexpensive (and even free!) jewelry making supplies
Container with lid to hold jars
I keep my supplies in jars in a medium-sized clear plastic big, similar to this one. It makes it easier to move all your supplies around. Check your home or your local thrift store, or put out a call on Freecyle or Buy Nothing if you don’t have one, or use a cardboard box at home.
A folding tray
A folding tray provides the perfect portable workspace. It gives you a flat surface on which to work, it is lightweight so you can easily move it around, and it stores flat which is essential if you live in a smaller home.
I use a simple plastic and metal one I purchased at IKEA years ago, but any folding bed tray will do the trick.

You can also check out your local thrift store to see if they have any on hand. I recommend you choose one with a raised edge to help prevent supplies from rolling off.
Alternatively, you can use a large picture frame. It will give you the raised edges you need to keep your supplies contained. The only downside is you won’t have the benefit of the raised workspace that a tray offers.
A sheet of craft felt
Simply lay a piece of craft felt onto your tray and it will further contain your jump rings, beads, and other materials that are prone to roll around. (It won’t completely prevent beads from rolling, but it will help.) Most craft supply stores sell them for less than $1.00 per sheet.
A storage container
Now that you have your portable station set up, it’s time to organize all of your supplies and materials. I’m personally a huge fan of the Sterlite Layer Stack & Carry Box. It is compact, has trays with compartments, and can lay them all out flat. Plus you can add additional trays if you find you need more storage.
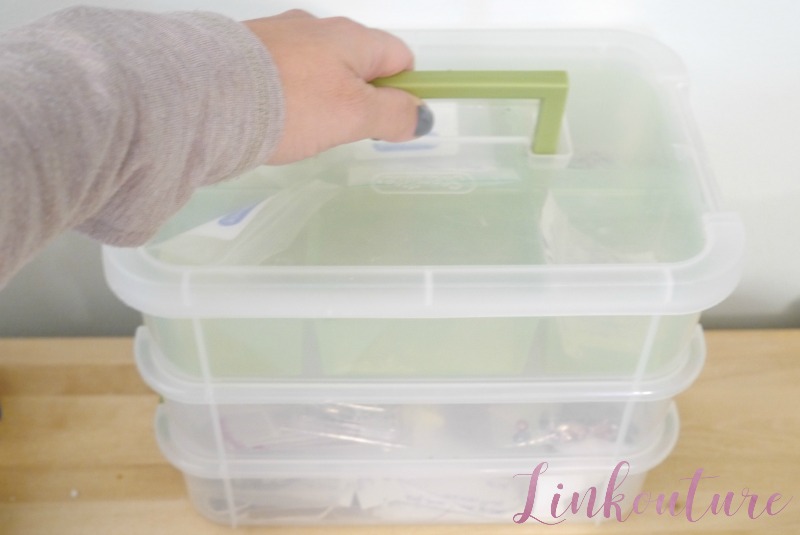
I purchased one a few years ago and found it was perfect for toting around my pliers and supplies to shows, and takes up very little space on my workbench. You can purchase additional dividers, which is perfect for organizing beads. If you are storing supplies that may tarnish, I recommend storing them in little plastic resealable bags.
IF YOU FOUND THIS post on organizing your jewelry-making supplies HELPFUL, CONSIDER LEAVING A TIP!
Leave a here tip if you’d like. They’re not required, but always appreciated 
Jewelry making inspiration delivered straight to your inbox
Sign up for the Linkouture newsletter to receive ideas, tutorials, and practical steps for jewelry making e-mailed to you. You’ll also get exclusive access to my FREE mini video course, Jewelry Making Basics.
You are signing up to receive promotional and marketing materials from Linkouture. You may unsubscribe at any time. Check out Linkouture’s privacy policy for details.
Like this post? Pin it for later!
Your shares are how this site grows and to help more people like learn how to make jewelry! Know a friend who’d like this? Please share it on Facebook or save it to your favorite jewelry-making DIY ideas board on Pinterest.
