Linkouture

Jewelry making made easy

  • Linkouture
  • Home
  • About
    • New? Start here!
    • Contact
  • Blog
    • Jewelry Tutorials
    • Creative Entrepreneurship
    • Organization Tips
  • Products
    • Courses
    • Creativity Workbook
    • Free Jewelry Making Mini-Course

A beautiful and seriously easy DIY necklace tutorial

Pin979
Share1
Email
980 Shares

I glance over at my workbench and let out an exasperated sigh. I dig around under pieces of paper, pushing aside tools and bits of silver and half-formed pieces of jewelry that litter the surface.

Hard as I try to keep my physical space organized, my workspace is almost always a hot mess.

Case in point: as I sat at my desk writing this easy DIY necklace tutorial and look over at my workbench, this is exactly what I see:

Learn how to make a gorgeous piece of jewelry with this easy DIY pendant necklace tutorial!

Sadly, this is a common occurrence.

While this constant state of chaos is often the source of frustration because inevitably I cannot find the tool or supply I need — and very often, it is something I literally just put down — it also leads to these fantastic inadvertent “Aha!” design moments. 

Or happy accidents.

For example, the necklace I’m about to show you how to make.

Learn how to make a gorgeous piece of jewelry with this easy DIY pendant necklace tutorial!

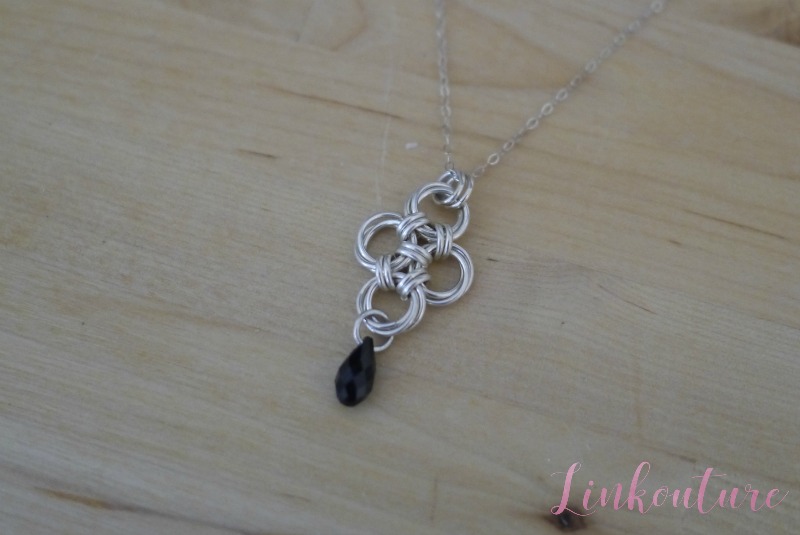
Back in 2011 when I was preparing for my wedding, I decided to make my bridesmaids necklaces. My colors were purple and silver; naturally I went with a silver necklace with a purple Swarovski briolette pendant accent.

(In case you’re wondering, a briolette is just a fancy word for an elongated pear-shaped crystal)

There were five bridesmaids, and the briolettes came in packages of six, so I had an extra one.

One sad, lonely briolette that went unused for years, just sitting in my bead box, day after day, week after week.

Fast forward four years. One day I’m working on a pair of earrings for a show. The briolette happens to be just hanging out on the workbench, minding its own business when I place the half-made earring onto the bench right next to it as I went digging around for an earwire.

I look down. Aha!

Happy accident.

Perhaps sometimes it pays to be messy.

And now, my friends, for the easy DIY necklace tutorial with its fancy shmancy crystal pendant:

(And just a little heads up, those are affiliate links, which means if you make a purchase I may earn a small commission at no extra cost to you. That commission helps me to run this blog — or, at the very least, it will cover about one cup of coffee a month.)

For this necklace, you will need the following supplies:

  • 2 pairs of flat nose pliers
  • 12 large open jump rings
    • I use 18-gauge 7.0 mm inner diameter (ID) sterling silver rings
  • 13 small open jump rings
    • I use 18-gauge 3.5 mm ID sterling silver jump rings
  • 2 tiny open jump rings
    • I use 22-gauge 2.2 mm ID sterling silver jump rings
  • length of chain 
    • for an 18-inch necklace, I use about 17 1/2 inches of flat cable chain
  • 1 small lobster clasp
  • 1 Swarovski briolette
    • I used one that a 11x5mm briolette. You can use any bead or accent of your choosing

Instructions:

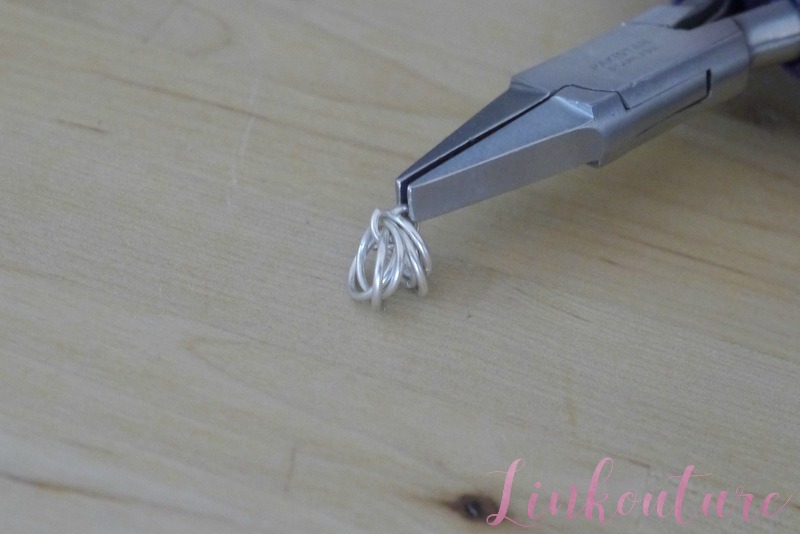
To get started with this easy DIY necklace tutorial, make 4 sets of 3-ring mobius spirals. (If you aren’t sure how to do that, check out this tutorial.)

Now loop one of the smaller jump rings (3.5mm) through one of the spirals like so:

Learn how to make a gorgeous piece of jewelry with this easy DIY pendant necklace tutorial!

(And pay no attention to the fact that workbench looks like it changed colors. I swear it’s the same table.)

Go ahead and add another spiral onto that little jump ring and close it up nice and snug like a bug in a rug….erm, I mean like a snugly closed jump ring.

Learn how to make a gorgeous piece of jewelry with this easy DIY necklace tutorial! featuring a gorgeous Swarovski crystal pendant!

(Can you tell that I spend too much time around small children?)

(By the way, how much fun are you having with my tangents? Don’t worry, it’s even worse in person!

Connect the two spirals with another small jump ring, and continue with the other two jump rings until you have a little caterpillar of jump rings.

Learn how to make a gorgeous piece of jewelry with this easy DIY necklace tutorial! featuring a gorgeous Swarovski crystal pendant!

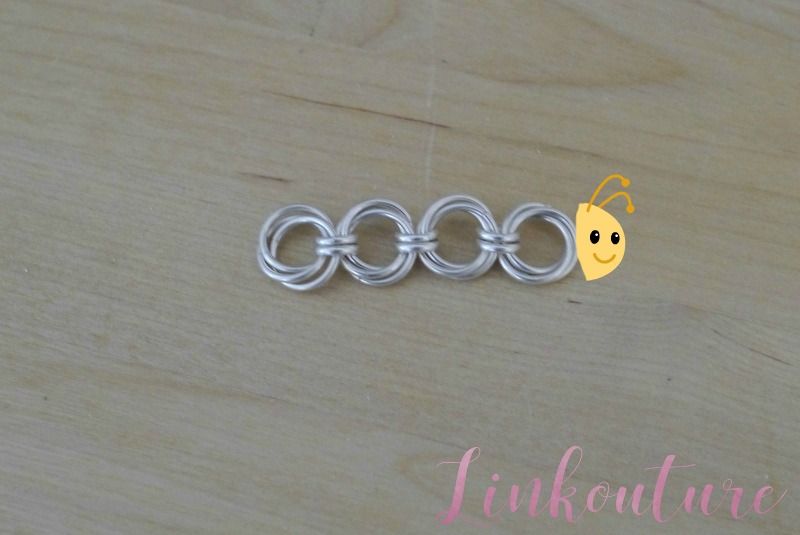
See, caterpillar! Wait, yours doesn’t look like that?

Loop your (imaginary) caterpillar’s head around so it’s getting a nice look at its tail end like so:

Learn how to make a gorgeous piece of jewelry with this easy DIY necklace tutorial! featuring a gorgeous Swarovski crystal pendant!

Just like you did with all the other spirals, connect the head and the end with two more jump rings. It may not look quite right when you’re in the process, but when one end is pulling from the tension of the chain I promise it will!

Learn how to make a gorgeous piece of jewelry with this easy DIY necklace tutorial! featuring a gorgeous Swarovski crystal pendant!

Learn how to make a gorgeous piece of jewelry with this easy DIY necklace tutorial! featuring a gorgeous Swarovski crystal pendant!

Just be sure not to twist the line around or it will definitely look off. Or keep it as is. The only rule I have around here is to have FUN and enjoy your jewelry-making process.

(Though I promise you I have my moments of frustration with the process.)

Now use one last jump ring to add your bead to one of the spirals (doesn’t matter which one)…

Learn how to make a gorgeous piece of jewelry with this easy DIY necklace tutorial! featuring a gorgeous Swarovski crystal pendant!

Attach another jump ring or two to the spiral on the opposite end, string it on a chain, and ta-da, a super simple yet fancy-looking pendant.

Learn how to make a gorgeous piece of jewelry with this easy DIY necklace tutorial! featuring a gorgeous Swarovski crystal pendant!

Unsure about how to make a chain? Scroll to the bottom of this post to see how!

Learn how to make a gorgeous piece of jewelry with this easy DIY necklace tutorial! featuring a gorgeous Swarovski crystal pendant!

Now go tell me in the comments — who will your first necklace be for, and what color will it be?

«
»

Beginner Jewelry Tutorials, Jewelry Tutorials, Necklaces, Uncategorized 18

Reader Interactions

Comments

  1. Janine Huldie says

    September 23, 2016 at 6:32 am

    Gorgeous pendant and seriously though you are just so talented and creative with all your jewelry making ?

    Reply
    • Bev F. says

      September 23, 2016 at 6:47 am

      Thank you, Janine! <3

      Reply
  2. Mrs.AOK says

    September 24, 2016 at 11:42 am

    This necklace is gorgeous!!! I sincerely wish I had your talent. I could see my chubby fingers getting in the way and then my mouth spouting off colorful language. 🙂 You are a jewelry making superstar!
    XOXO

    Reply
    • Bev Feldman says

      October 5, 2016 at 10:40 am

      Thank you <3 I think you could do this...just take a little bit of practice 😀 (And my early days of jewelry making -- and sometimes now -- includes some colorful language as well!)

      Reply
  3. Tamara Bowman says

    September 25, 2016 at 8:17 pm

    First of all, it’s gorgeous.
    Secondly, my mom is an artist as you know and we were talking about “happy accidents” in art. It started because she told me that she loved the way my words and photos aligned in my recent post and I said it was an accident. Then she told me about how she matches up paper and frame materials for hanging artwork and she puts them in two piles and they always suit each other as perfect pairs.

    Reply
    • Bev Feldman says

      October 5, 2016 at 10:41 am

      Thank you! Your words and photos do align so well, it is like they were meant for each other. But that’s amazing about your mom’s artwork! Sometimes these things just have a way of working out.

      Reply
  4. Dana says

    September 28, 2016 at 7:01 pm

    So pretty! I’d like to say I will make one, but I’d rather just buy from you! I love your tangents, btw, and your little caterpillar. 🙂

    Reply
    • Bev Feldman says

      October 5, 2016 at 10:41 am

      Thanks! I think I had a little too much fun with that caterpillar 😉

      Reply
  5. darlene mcclard says

    January 27, 2017 at 1:45 am

    I notice you say small lobster clasp. can you tell what size you used?

    Reply
    • Bev Feldman says

      January 27, 2017 at 3:28 pm

      Hi, Darlene, thanks for your question! I typically use a 9.3mm clasp. It’s pretty small, and I think it would also work with a slightly bigger one as well (around 13mm)

      Reply
  6. Edith J. Figueroa says

    March 26, 2017 at 12:23 pm

    Very Pretty!

    Reply
    • Bev Feldman says

      March 27, 2017 at 9:50 am

      Thank you, Edith!

      Reply
  7. Rose says

    September 24, 2018 at 2:07 pm

    nice design would make a lovely set with earrings

    Reply
    • Bev Feldman says

      October 26, 2018 at 10:47 am

      Thank you! I agree 😉

      Reply
  8. Kelly Lose says

    November 12, 2018 at 7:05 pm

    OMG!!! You are Just too Funny!! I am enjoying your tutorials, and what did you call them. ..little rants? I can’t remember anyways I do Like them… gives me chuckles every time!! Thank you….I can’t wait to try to make this necklace!! 😊💗

    Reply
    • Bev Feldman says

      December 11, 2018 at 12:08 pm

      Thanks, Kelly, glad you enjoyed it 🙂

      Reply

Leave a Reply Cancel reply

Your email address will not be published. Required fields are marked *

This site uses Akismet to reduce spam. Learn how your comment data is processed.

Primary Sidebar

I believe in the importance of creative outlets, even when you think you lack time, talent, or the "right" skills. Read More…

Featured Articles

female hands holding a cell phone over a laptop computer

How to host a virtual trunk show for your jewelry business

toothbrush cleaning silver jewelry

How to clean tarnished silver jewelry with pantry items

happy woman making jewelry with her friend

The secret to what makes me a happy person

Turquoise stones for Jewelry making

Short on space? Create a portable jewelry workstation

Footer

Meet Bev

Welcome, I'm Bev! I'm a jewelry designer and organized creative who teaches busy people who think they don't have time to carve out space in their days to learn the basics of jewelry making. Read More…

connect

(617) 863-6645

FacebookPinterest Instagram Email

About

Blog
Disclosure
Privacy Policy
Terms of Service
Cookies
Work with Me

2021 · Linkouture

Copyright © 2021 Linkouture

We are using cookies to give you the best experience on our website.

You can find out more about which cookies we are using or switch them off in settings.

Linkouture
Powered by  GDPR Cookie Compliance
Privacy Overview

This website uses cookies so that we can provide you with the best user experience possible. Cookie information is stored in your browser and performs functions such as recognising you when you return to our website and helping our team to understand which sections of the website you find most interesting and useful.

You can adjust all of your cookie settings by navigating the tabs on the left hand side.

You can find Linkouture's full Privacy Policy here.

Strictly Necessary Cookies

Strictly Necessary Cookie should be enabled at all times so that we can save your preferences for cookie settings.

If you disable this cookie, we will not be able to save your preferences. This means that every time you visit this website you will need to enable or disable cookies again.

Cookie Policy

More information about our Cookie Policy