I love DIY craft projects, but I am also notorious for starting things and then not finishing them. (If you ever look at my yarn baskets you will find at any given time at least three partially-completed projects. It took me an entire year to make the match to a fingerless glove I started one fall, which would have been fine I only needed one. And don’t get me started on scrapbooking.)
Alas, I had fun a few weekends ago spray painting some stuff, including these awesome DIY upcycled wine bottle bracelet holders and two picture frames for earrings/jewelry supply organizing. Since the bottles only required one step (i.e. painting) I was able to complete them that day. The latter project, requiring several more steps, took me a little longer and the painted frames ended up sitting on my kitchen floor for several weeks. Thankfully Sam is *generally* very tolerant of my trail of crafty crap that follows be around the house and didn’t say anything about them. (Apparently it’s only tiny bits of metal wire that end up all over the floor that bug him.)
After the paint dries, the thing theoretically should only take about 15 minutes to make (unless you have issues screwing in the screw eyes like I did–thirty minutes and a very red thumb tip later and I still could not get the damn thing to stay in. I might not be very good about finishing projects, but at least I’m stubborn persistent about trying to make something work when I do set my mind to it.)
Anyway, here is what you need to make this simple DIY earring display (and links to what these hardware items are–I didn’t know the technical term for most of them until I wrote up this blog post):
- Wooden picture frame with glass and backing taken out, painted if you like (I used Krylon Make it Stone!® Textured Paints)
- A roll of screen mesh
- 2 screw eyes
- Picture frame wire
- Picture frame hook & nail
- Staple gun
- Scissors
- Hammer
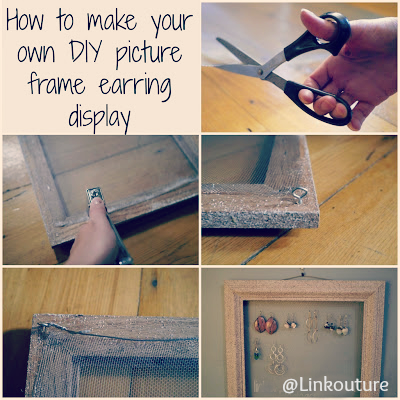
1. Cut a piece of screen mesh so that it a little bigger than the opening in the back of the frame. I used regular scissors I had lying around–this stuff isn’t very thick–but you might not want to use your best pair of scissors.
2. Pull the screen taut over the back of the frame and staple it to the frame as tight as you can without pulling the mesh apart. Make sure you staple it to all side of the back of the frame.
3. Screw in the screw eyes at the top of the frame, one on each end. (I recommend in hammering a nail in a couple millimeters to get the hole started.)
4. Wrap the picture frame wire around the screw eyes so that it is strong enough to hold up the frame.
Your lovely creation can now be hung! Put it up wherever your heart desires; you earrings are now ready to be beautifully displayed (and now you can actually see what you have. I bet you found some earrings you didn’t even remember you had!)
Now for a lovely visual of the process using my awesome camera that I am still figuring out: