Linkouture

Jewelry making made easy

  • Linkouture
  • Home
  • About
    • New? Start here!
    • Contact
  • Blog
    • Jewelry Tutorials
    • Creative Entrepreneurship
    • Organization Tips
  • Products
    • Courses
    • Creativity Workbook
    • Free Jewelry Making Mini-Course

A clever (and cheap!) DIY hack to organize your jewelry

Pin199
Share
Email
199 Shares

You throw on a pair of jeans that lay crumpled on the floor next to your bed and pull a shirt on over your head that is only mildly wrinkled. You take one last gulp of your coffee, which, like most days, has become tepid by the time you finally have a chance to drink it. As you rummage through the mess of jewelry that lays scattered on your dresser, you let out a frustrated grunt under your breath wondering where your favorite pair of earrings is in that jumbled pile.

I get it. You’d think as a jewelry designer I’d do a better job of organizing my jewelry, but the truth is after a long day sometimes I just end up tossing what I wore onto an ever-growing pile. Necklaces and earrings get tangled together, silver jewelry becomes gray and dull with tarnish from too much exposure to the air.

Lucky for us, there is a really simple (and fun!) solution to getting your jewelry situation from hot mess to beautifully organized, for under $10. 

Please note: this post contains affiliate links, which means if you click on them and make a purchase I will earn a small commission. 

To make your display you will need:

  • A picture frame*
  • Piece of foam board that is at least the size of the picture frame
  • Piece of fabric bigger than the frame (in this case, I used an old pillowcase)*
  • Glue (nothing fancy, can be your child’s glue)
  • Ruler & Xacto knife OR scissors
  • (Optional) spray paint

*I recommend purchasing the frame & piece of fabric from a thrift store to save on costs. In my case, I purchased them at Goodwill

Before you get started, make sure the fabric is free of wrinkles, so iron it out if need be. If your frame needs a little retouching, spray paint it and allow it to fully dry, following the directions on the can, before you proceed.

How to make the DIY jewelry organizer

Trace a piece of foam board so that it will fit snugly inside the frame.

Make a beautiful DIY jewelry organizer with just a few cheap supplies. It is the perfect way to display your jewelry on the wall or prop up on a table.

You can either use scissors to cut along the lines, or use a ruler and guide an X-acto knife to cut it.

Make a beautiful DIY jewelry organizer with just a few cheap supplies. It is the perfect way to display your jewelry on the wall or prop up on a table.

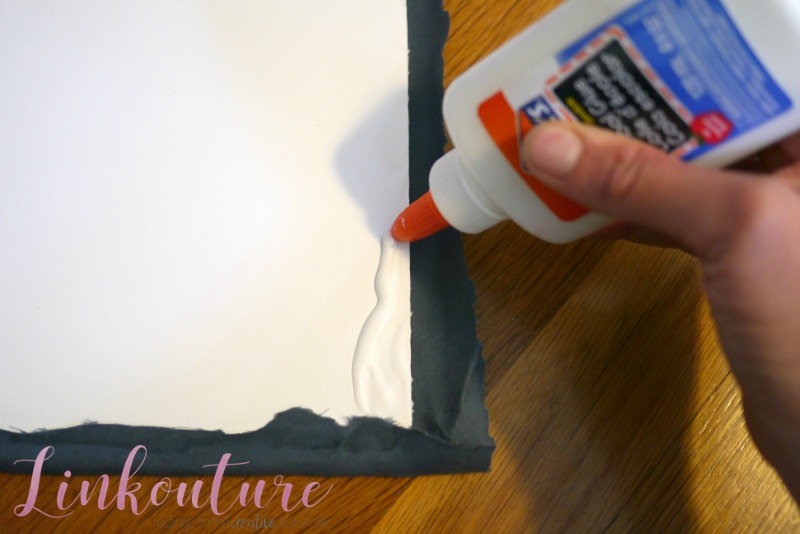
Lay the piece of foam board over the piece of fabric so that there is a bit of extra fabric around each edge of the foam board (1/2 inch on all edges should be sufficient). Glue two adjacent sides of the fabric to what will be the back side of the foam board. (I just used basic white Elmer’s glue.)

Make a beautiful DIY jewelry organizer with just a few cheap supplies. It is the perfect way to display your jewelry on the wall or prop up on a table.

Once it has dried, pull the fabric taut and glue the two remaining edges.

Make a beautiful DIY jewelry organizer with just a few cheap supplies. It is the perfect way to display your jewelry on the wall or prop up on a table.

Once it is dry, pop it into the frame with the fabric part facing forward. If there are tabs in the back of the frame, bend them down to keep the fabric-covered foam board secure. Otherwise, you can tape the back so it will stay in securely.

Hang it up, prop it against a wall, or stick it in a stand, and you’re set to go! I used jewelry u-pins to hang the jewelry from, but any decorative push pins will work. It looks great paired next to some painted bracelet bottles!

How do you keep your jewelry organized?

Make a beautiful DIY jewelry organizer with just a few cheap supplies. It is the perfect way to display your jewelry on the wall or prop up on a table.

A version of this post first appeared on The Organized Mama

«
»

All About Jewelry, DIY & Crafts, DIY, Tutorials & Recipes, Jewelry Blog, Jewelry Care + Display, Jewelry Display, Uncategorized 13

Reader Interactions

Comments

  1. Janine Huldie says

    August 26, 2016 at 6:59 am

    Absolutely love this and like you not only the most organized sadly myself, as well though.

    Reply
    • Bev F. says

      September 5, 2016 at 11:54 am

      I think that’s the story for many of us!

      Reply
  2. Mrs.AOK says

    August 26, 2016 at 11:13 am

    Sooo.. I’ve been meaning to do something like this for sometime. I’ve stalked all the DIY jewelry organizer ideas on Pinterest, and still I rummage for jewelry on my dresser, desk, side table, and ummm… a saint. I’m a hot mess with my jewelry. I also have some stored in a really fancy top of the line (don’t get jealous) plastic bin. 😀
    Pinning this!
    XO

    Reply
    • Bev F. says

      September 5, 2016 at 11:54 am

      I’m still a hot mess with my jewelry and do the one thing I tell others not to do — leave silver jewelry out exposed to air! :-O

      Reply
  3. Tamara Bowman says

    August 29, 2016 at 10:05 pm

    This is so.. my mom. She does genius things like you with Xacto knives, foam, and glue. My jewelry drawer is a hot mess!

    Reply
    • Bev F. says

      September 5, 2016 at 11:54 am

      Xacto knives are so much fun 🙂

      Reply
  4. Lucinda-Luise Page says

    August 31, 2016 at 1:51 pm

    I just do not see:
    A how would this save my silver from being exposed to the air?
    B the jewelry on this frame does not constitute “a pile”, this will not hold or organize much jewelry.
    It is an elegant and cute solution if you do not need to protect your pieces. The pieces on this frame will get dusty and pitted…

    Reply
    • Bev F. says

      September 5, 2016 at 11:58 am

      Thanks for your comment, Lucinda-Luise. I have made a similar jewelry organizer with bigger frames, so you can organize more jewelry depending on the size you choose to make it. And you are right, I would not suggest this as a way to organize silver jewelry if you don’t want it to get tarnished. I did take a bit of poetic license with writing the intro.

      Reply
  5. Stephanie says

    June 17, 2017 at 11:20 am

    Pretty DIY for all that beautiful jewelry you make. Tweeted. 🙂

    Reply
    • Bev Feldman says

      June 18, 2017 at 7:55 am

      Thank you, Stephanie!

      Reply

Leave a Reply Cancel reply

Your email address will not be published. Required fields are marked *

This site uses Akismet to reduce spam. Learn how your comment data is processed.

Primary Sidebar

I believe in the importance of creative outlets, even when you think you lack time, talent, or the "right" skills. Read More…

Featured Articles

female hands holding a cell phone over a laptop computer

How to host a virtual trunk show for your jewelry business

toothbrush cleaning silver jewelry

How to clean tarnished silver jewelry with pantry items

happy woman making jewelry with her friend

The secret to what makes me a happy person

Turquoise stones for Jewelry making

Short on space? Create a portable jewelry workstation

Footer

Meet Bev

Welcome, I'm Bev! I'm a jewelry designer and organized creative who teaches busy people who think they don't have time to carve out space in their days to learn the basics of jewelry making. Read More…

connect

(617) 863-6645

FacebookPinterest Instagram Email

About

Blog
Disclosure
Privacy Policy
Terms of Service
Cookies
Work with Me

2021 · Linkouture

Copyright © 2021 Linkouture

We are using cookies to give you the best experience on our website.

You can find out more about which cookies we are using or switch them off in settings.

Linkouture
Powered by  GDPR Cookie Compliance
Privacy Overview

This website uses cookies so that we can provide you with the best user experience possible. Cookie information is stored in your browser and performs functions such as recognising you when you return to our website and helping our team to understand which sections of the website you find most interesting and useful.

You can adjust all of your cookie settings by navigating the tabs on the left hand side.

You can find Linkouture's full Privacy Policy here.

Strictly Necessary Cookies

Strictly Necessary Cookie should be enabled at all times so that we can save your preferences for cookie settings.

If you disable this cookie, we will not be able to save your preferences. This means that every time you visit this website you will need to enable or disable cookies again.

Cookie Policy

More information about our Cookie Policy