Delicate and feminine, and yet so simple to make, this DIY single pearl necklace is the perfect handmade jewelry gift idea or even a treat for yourself!
They’re also the perfect solution to all those beads you’ve been collecting.
(Don’t tell me I’m the only one who hoards craft supplies like a squirrel in northern New England on the hunt for acorns at the end of autumn.)
A few years ago I was suddenly OBSESSED with freshwater pearls. I started hunting around Etsy for the perfect strand of round, smooth beauties. Pink, burgundy, peacock, silvery-white — I couldn’t get enough.
Within a week, I had amassed at least a dozen strands of freshwater pearls in a rainbow of shapes, sizes, and colors.
With each click of the “buy” button, I continued on my quest for more freshwater pearls to add to the collection like it was my job.
Unfortunately, the more I ordered, the less I seemed inclined to actually make something with them.
Until years later, when inspiration hit and I realized they would be the perfect complement to a simple mobius spiral and make a gorgeous DIY pearl pendant.
Just a heads up, for your convenience, I have included affiliate links in this post. You can read my full disclosure here.
You can make your own freshwater pearl necklace multiple colors, or substitute the pearl for your favorite type of gem or eco-friendly bead. (Just make sure it’s a small one, as these spirals are quite small themselves!)

In this DIY pearl necklace tutorial, you’ll learn:
- How to make an wire eye loop above a bead using a ball head pin
- How to make a pearl pendant
- How to create your own custom-length chain
some tips for making this spiral pendant necklace:
Below you’ll find instructions on how to make pearl necklace at home step by step. But before we jump into how to make this necklace, here are a few notes:
I HIGHLY recommend these flat nose pliers for any of my jewelry tutorials. Keep in mind you will need two pairs of these pliers. Yes, they are pricey, but they are WORTH the investment. They are hands down the best jewelry tool I have ever purchased. (So much so that when they were confiscated by airport security after I forgot to take them out of my carry-on I immediately purchased another set.)

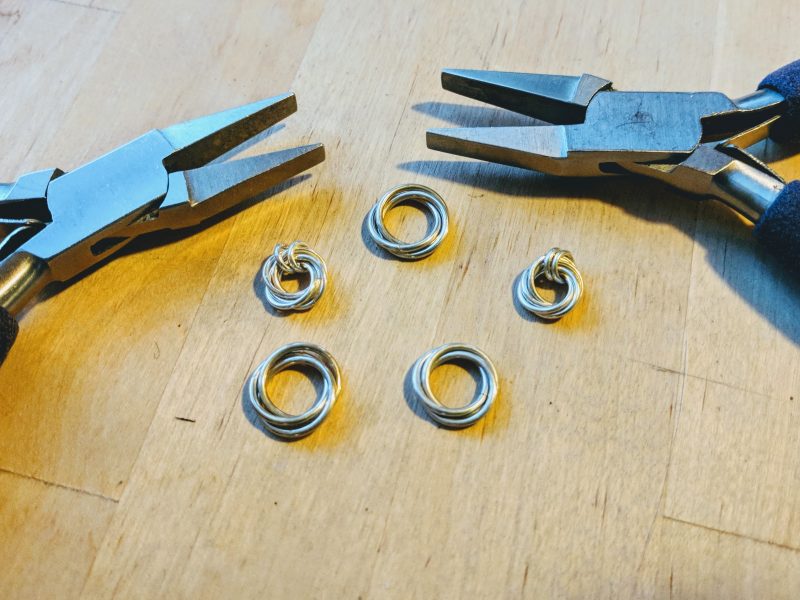
The main feature of this tutorial is a 3-ring mobius spiral. Unsure how to make one? You can learn how in my free mini video course.
This tutorial assumes some basic jewelry-making skills, including creating a simple eye loop above a pin. If you’ve never done this before or are a bit rusty at it, here’s a video tutorial of it. (By the way, this video tutorial is part of my signature course, Jewelry Making Fundamentals, a beginner level jewelry making course where you’ll learn how to make your own beautiful jewelry in just a few hours!)
How to make a bead and spiral necklace

Delicate and feminine, and yet so simple to make, these spiral pearl necklaces are the perfect DIY birthday present, mother’s day gift, or even a treat for yourself!
Materials
Jump Rings
- 3 large open jump rings (I use 16 gauge 9.5 mm ID (inner diameter) sterling silver jump rings)
- 2 small open jump rigs (I use 18 gauge 3.5 mm ID sterling silver jump rings
- 2 tiny jump rings (I use 22 gauge 2.2 mm ID sterling silver jump rings)
Other materials
- Freshwater pearl (I recommend about 5-6mm round, but you could do a potato shape, or do a different type of bead that's about the same size)
- 2 ball headpins
- 1 small lobster clasp (I use about a 9mm lobster clasp. You can skip this if you are using chain that comes with a clasp on it)
- length of chain (I prefer flat cable chain for an 18-inch necklace, I use about 17 1/2 inches
Tools
Instructions
- Using the three largest jump rings (9.5 mm), make a 3-ring mobius spiral.
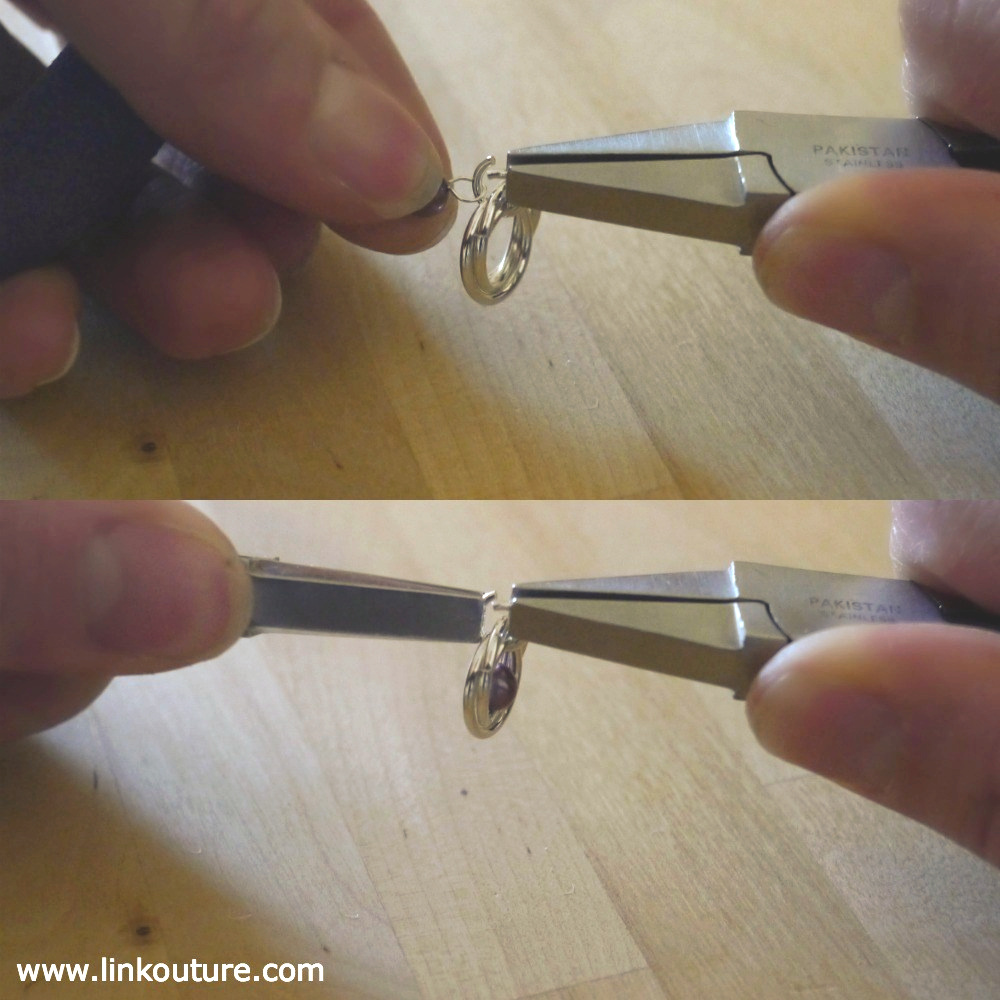
- String a headpin through the pearl. Using the round nose pliers or the step pliers, create a loop above the pearl so you can hang it from the pendant later.

- Take one of the smaller jump rings (3.5 mm) and string it through the large spiral you made (make sure the three large rings in the spiral stay together). Then string on the pearl through that lovely little loop you just made, and close the jump ring with the pearl and pendant together.

- Using the cable chain, loop the really tiny jump ring (2.2 mm) onto one end of the chain and then hook on the lobster clasp so that it's hanging from the chain. Close the ring so it is nice and secure.
- String on the pendant, making sure to go through the small jump ring (3.5 mm) so that the large spiral and pearl hang down.
 Once it is strung on, string another tiny jump ring (2.2 mm) on the other end of the chain and close it. Loop the small jump ring (3.5 mm) through the tiny one and close. (This is where you will hook on the clasp.)
Notes
I recommend purchasing all of the metal materials (i.e. jump ring, chain, clasp) from CreatingUnkamen. They're a wonderful family-owned business and sell high quality materials.
In my FREE mini video course, Jump Ring Jewels, you'll learn the right way to open and close a jump ring and how to make a Mobius spiral. Click here register or go to www.linkouture.com/jewelry-making-basics.
This tutorial assumes some basic jewelry-making skills, but if you'd like a video tutorial of this and all of the other skills used in this tutorial, I recommend you register for my paid course, Metal to Masterpiece. Click here to register or go to www.linkouture.com/fundamentals
Recommended Products
As an Amazon Associate and member of other affiliate programs, I earn from qualifying purchases.


(And note to self: make sure there is no shmutz on your hand before you photograph your hands for a jewelry tutorial. And moisturize. By the way, this is what my hand looks like after I have airbrushed it. Imagine what it looked like before!)
Enjoyed this tutorial? Leave a tip to say thanks!
Buy me a coffee
Want to make more jewelry with the same tools & supplies?
- Freshwater pearl earrings — These elegant earrings coordinate perfectly with this necklace
- Spiral chain bracelet — This chic bracelet looks really complicated but is basically just a bunch of spirals strung together.
- Freshwater pearl earrings & necklace gift set — Get the PDF tutorial (and a mini course to help you!) for this beautiful gift set that includes this necklace
Jewelry making inspiration delivered right to your inbox
Sign up for the Linkouture newsletter to receive ideas, tutorials, and practical steps for jewelry making e-mailed to you. You’ll also get exclusive access to my FREE mini video course, Jump Ring Jewels.
You are signing up to receive promotional and marketing materials from Linkouture. You may unsubscribe at any time. Check out Linkouture’s privacy policy for details.